The Travel Box
 One thing I wanted before I 'adopted' a hawk into my family was to have a safe,
and hopefully comfortable, travel box for it that fitted into my car properly.
I used to be a Range Rover owner and in that it would have been just too easy
but I have updated and gone to a super efficient hybrid. My newer, lower,
streamlined ultra economical thing really doesn't have any nice flat places to
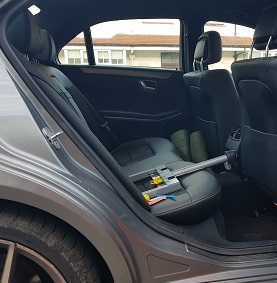
put something large and boxy. However I did notice that it had the standard
'Isofix' baby seat fixing points on the rear seats. I reasoned that I must be
able to do something creative with them for my new baby.
One thing I wanted before I 'adopted' a hawk into my family was to have a safe,
and hopefully comfortable, travel box for it that fitted into my car properly.
I used to be a Range Rover owner and in that it would have been just too easy
but I have updated and gone to a super efficient hybrid. My newer, lower,
streamlined ultra economical thing really doesn't have any nice flat places to
put something large and boxy. However I did notice that it had the standard
'Isofix' baby seat fixing points on the rear seats. I reasoned that I must be
able to do something creative with them for my new baby.
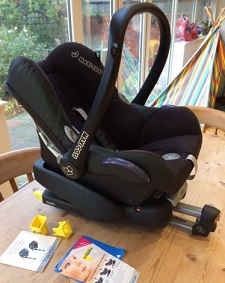
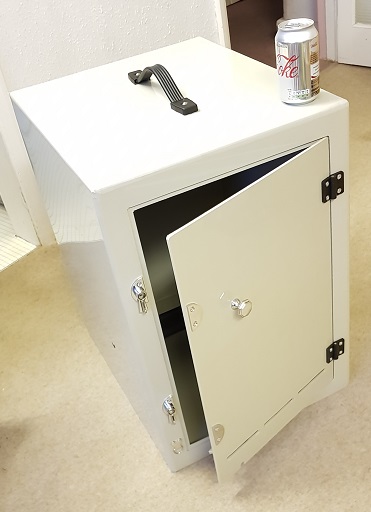
Let's start with the target hawk box as I'm definitely not making that. Steve
at Sussex Falconry said nice things about the products from
Falconry
Fabrications and he used them himself. Getting the right size was obviously
the critical thing to be both hawk and car friendly so this one is rated as big
enough for a female Harris Hawk by being 63.5cm tall, 43cm wide and 51.5cm deep
(Coke can for scale). A few checks revealed that if it faced the car door it
wouldn't actually much of a problem. However it had to be securely fastened and
kept upright. That would be a bit more of an engineering challenge.
The general rule that I have developed over the years is that if you want to
build a complex mechanism that you're not planning on selling then you first
try and find somebody else who has already done it well and use theirs. With
this in mind I bought a used child's car seat with all the testing approvals on
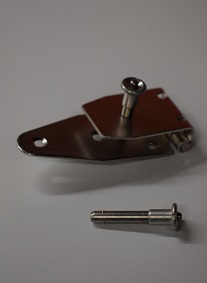
EBay (a Maxi-Cosi Cabriofix Car Seat with Isofix Base). Then I gutted it like a rat
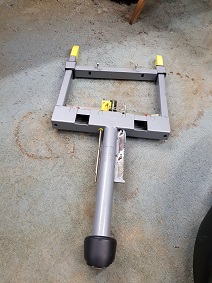
in the hawk food tray for its Isofix mechanism. The two yellow ends are the
lock-in claws that engage into the Isofix mounting points in the car giving a
child safety approved level of solidity and the release button is on the end of
the tube reaching forward with a nice colour change indicator in the button to
reassure you it is fully engaged. I kept the release mechanism pretty much 'as
is' because that put the control right where it was easy to get at and check it
was engaged and not something behind the box to try and check.
The next real snag was attaching the box to the mechanism. This part is
normally surrounded by its plastic case which is pretty solid but I wanted to
bolt it to a piece of plywood. I went for wood rather than metal as welding up
plates would make the end result too heavy to handle. There were two nice
tapped bolt-holes in the rear cross arm but that is loose in the fore-and-aft
direction so I wanted some proper bolts but this is box section and too thin to
tap. The solution I settled for was M6 bolts with a 15mm hole in the other side
of the box section to get a slender socket through and nylock nuts. Not ideal
but it provided enough rigidity.
I removed the seat's leg that supported the button end of the mechanism even
though it would have added even more stability as it could easily become a
serious 'in the way' problem installing and removing things. Sadly in the sort
of accident that that was designed to protect against the hawk, loose in its
box, will probably get thrown about badly but getting a hawk to wear a seatbelt
is just not going to happen. For normal 'social and domestic' travel we just
need to keep things stable.
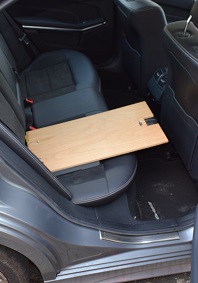
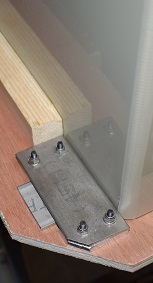
The next stage was to make a level 'table' for the box to sit on. This has to
be the full size of the box as its bottom is recessed and it sits on its edges.
The slope of the seat is taken out with some tapered wooden blocks between the
baseplate and the table. These parts are liberally screwed together.
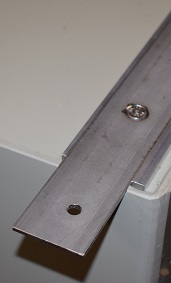
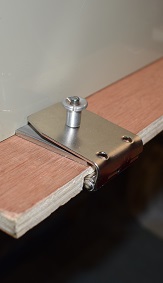
To provide something to clamp the box to the table I fitted two 40mm x 3mm
stainless steel bars to it that are set into the recessed base with the rest of
the gap filled by some 7mm Ali plates so the bars are flush with the bottom of
the box to minimise any stress. There are further stainless steel strips inside
the box to act as a full width 'washer' to distribute the load and it uses M6
stainless bolts sawn off flush with their nylocks to minimise the things that
stick into the box. The bars project about 5cms at the sides and on the left
hand side, towards the rear of the car, engage in fabricated metal slots that
provide positive location. What you do is place the box on the table, push it
away from you so it locates against the back stop then push it sideways,
towards the rear of the car, to run it up against the side stop. This slides
the bars in their slots pretty painlessly.
On the other side, towards the front of the car, the attachments have to stay
out of the way while the box is being slid about so I put the fixings on hinges
so they swing away over the front and when they come back up they clamp in
place with a pair of Zoot pip pin fasteners from the Hang Gliding toolbox.
These delightful things have balls that stick out near the tip of their pin end
that vanish inside when you push the button on top. They go right through the
wood and engage in the stainless steel of the hinge below sandwiching the bar
and the table.
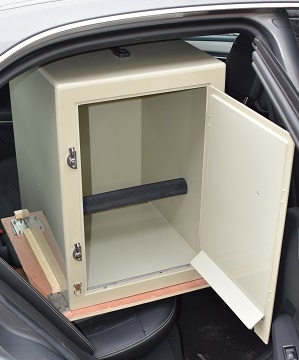
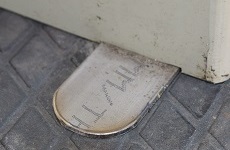 In use you had to be careful. Those bars originally stuck out like the mythical
swords on Boadicea's chariot and it was a squeeze getting it through the door
without scalping the upholstery or the paintwork. It was never going to go in
with a hawk inside but, once installed, the box door opened fully so the
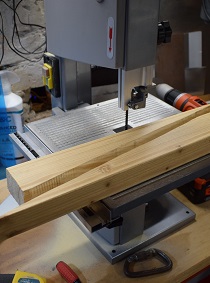
passenger can mount and dismount at will. I had to resort to the angle grinder
to round the ends of the bars into nice, safe semi-circles.
In use you had to be careful. Those bars originally stuck out like the mythical
swords on Boadicea's chariot and it was a squeeze getting it through the door
without scalping the upholstery or the paintwork. It was never going to go in
with a hawk inside but, once installed, the box door opened fully so the
passenger can mount and dismount at will. I had to resort to the angle grinder
to round the ends of the bars into nice, safe semi-circles.
As you can probably tell I'm rather pleased with the way it came out. Deciding
on the details of the design and sourcing the parts was probably more
complicated than the actual execution, well provided you gloss over the angst
of getting nice countersinks in stainless steel. However it is worth pointing
out that all this messing about put another 75% on the price of the
box.
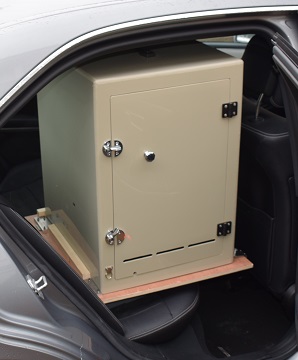
Oh and yes, as observant people have pointed out, it is a Mercedes E300 so not
actually the best choice for putting a big case into but, as you can see, it
does have just enough headroom. The Falconry Fabrications box seems well
designed to keep all the mess inside and my woodwork is protected by a couple
of coats of marine varnish. Frankly the hawk makes less mess in my car than my
wellies.
Back to main falconry page.

by Nigel Hewitt